Study Background
What is Hypertension?
Resource Information
Patient Resources
National DNA repository
Recruitment Procedures
Acknowledgements
Contact us
Genome Screen Results
Investigators
Nursing and Scientific Teams
|
|
|
start
page |
register
| log-in | software
Standard
operating procedure
Electrocardiogram (ECG)
No: 004D
1. Introduction
The electrocardiogram provides a baseline reading which shows
the electrical alterations within the intracellular potential
of myocardial cells. This facilitates the diagnosis of underlying
ischaemic heart disease and offers a baseline for hypertensive
subjects for which later readings can be compared. The ECG of
hypertensive subjects can ,for example, indicate the need for
good blood pressure control and, where certain wave formations
reveal left ventricular hypertrophy, it may suggest that there
is organ damage. It is therefore vital that the technique be
performed efficiently by competent individuals, so accurate
analysis can be performed.
2. Responsibilities
Physicians and research nurses trained in the method are responsible
for recording electrocardiograms from all subjects.
3. Equipment
- 12 lead
ECG electrocardiograph (Siemens -Sicard 440)
- Biotabs
- Alcohol
impregnated wipes
- Razor
and sharps bin
- Pillows
x 2
- Couch
4. Method
Preparation
of subject
- Explain
the procedure to the subject, ensuring that it is pitched at
their level of understanding. Too much or little information
may cause unnecessary anxiety and should be avoided if possible.
Be sure to explain that the procedure is painless.
- Instruct
the subject to position themselves on the couch. They should
have their upper torso lying at an angle of about 45o, with
their head supported by two pillows. Their arms should lie parallel
to their body and their legs should be extended.
- Try to
get the subject to relax. They should have been settled for
approximately 5 minutes prior to commencing the reading.
- Chaperones
may be required for males recording female ECG`s. Ensure subject
privacy at all times.
Preparation of equipment
- Ensure
that the ECG machine has been suitably charged or plugged into
the mains supply. Switch it on (off is marked O) using the black
switch on the back left hand panel. Press the ON/OFF button
on the top left hand side of the monitor. The visual viewfinder
will display "self test in progress" and then proceed to display
"self test ok."
- Check
all 12 leads are present and functioning, either by recording
a rhythm strip or ensuring that the "leads unavailable" message
is not present.
- Ensure
that a fresh box of Biotabs and alcohol impregnated wipes are
at hand.
Recording patient details
- Look in
the bracketed box < >, to show how many recordings have been
stored in the memory; the number shows how much space is remaining.
It is always advisable to ensure that there are more than 10
spaces remaining before storing a further recording. This ensures
that a recording previously stored is not lost.
- The buttons
needed to programme the subject's details are button 1 (left
hand side) and the general keyboard figures for letters and
numbers.
- Press
button 1.Enter the letters GH (this is needed for the interpretation
of the transmitted ECG recordings, it enables the data to be
recognised as Genetics of Hypertension results). The subjects
unique ID number should then be entered. This should read LN
(representing study area-for analysis purposes) 00001 (5 numbers
representing family ID) 000 (3 numbers representing subject
position number).
For example, an ID which appears as:- GHLN00001001 suggests
LN = London research centre, 00001 = Family ID 1, 001 subject
position in family (1=mother / 2=father 3=siblings).
- The following
sequence should then be strictly adhered to, to enter individual
subject details:- (Use the down arrow (top right hand side)
and menu button.)
| Press
the down arrow - |
enter
subject's last name |
| Press
the down arrow - |
enter
subject's first name |
| Press
the down arrow - |
enter
subject's age |
| Press
the down arrow - |
press
the right arrow and select male or female |
| Press
the down arrow - |
press
the right arrow, select drug therapy (If required 2 can
be selected) |
| Press
the down arrow - |
press
the right arrow, select clinical class (all should either
be No 01 normal or No 04 hypertensive) |
| Press
the down arrow - |
press
the right arrow, enter your research ID initials |
| Press
the down arrow - |
press
the right arrow, ignore REQBY |
| Press
the down arrow - |
press
the right arrow, enter location (GP
practice code) |
For details that need to be altered, use the � arrow to relocate
the data and then type over the previous information with the
changes.
Applying the leads
- Instruct
the subject to remove clothing from the upper body and to relax
as much as possible on the couch. Instruct ladies to remove
their tights.
- Clean the
skin with the alcohol wipes prior to placing the Biotabs. Allow
the alcohol to air dry to ensure a good contact.
- It may
be necessary to shave away some body hair from the chest where
the Biotabs do not sit securely. This is obviously done as needed
and with the subject's consent to do so. Biotabs which do not
sit securely on the skin do not give very clear readings.
- Place the
10 Biotabs on the limbs and chest positions as illustrated in
figure 1:-
figure
1
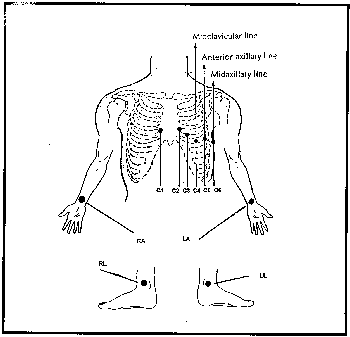
| Ideal
positions for limb and chest leads
|
| RL |
Right
leg, inner ankle (black lead) |
| LL |
Left
leg, inner ankle (green lead) |
| RA |
Right
arm, inside wrist (red lead) |
| LA |
Left
arm, inside wrist (yellow lead) |
| C1 |
Fourth
intercostal space, at right sternal edge |
| C2 |
Fourth
intercostal space, at left sternal edge |
| C3 |
Midway
between C2 and C4 on left side |
| C4 |
Fifth
intercostal space at midclavicular line on left side |
| C5 |
Same
level as C4 on anterior axillary line on left side |
| C6 |
Same
level as C4 on midaxillary line on left side |
It
is vital that the chest leads are positioned accurately and
limb leads are placed in the correct places. Failure to do
this will give rise to unusual ECG data and possibly inaccurate
interpretation of results.
Electrocardiography
- A guide to practice, The Royal Hospitals NHS trust.
|
|
|
|